The counterexample for the Dobkin and Snyder algorithm
that we present here is based on the one described in [1].
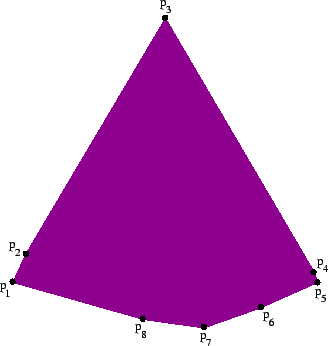
It is a convex polygon defined by eight points
(p1, p2,..., p8)
such that p3 and p7 alone achieve the diameter.
The other points are arranged to prevent the algorithm from ever
encountering p3 and p7 as a local maximums
of one another
(refer to Figures 7 to 12):
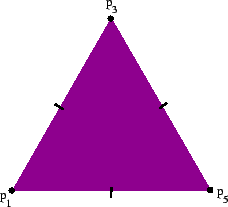
Points p1, p3 and p5 form an equilateral triangle.
We use d to denote the length of the sides of this triangle.
Figure 7:
Equilateral triangle (1 of 6).
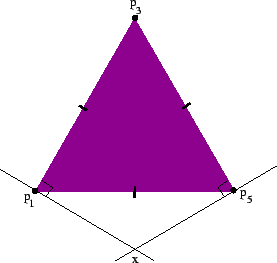
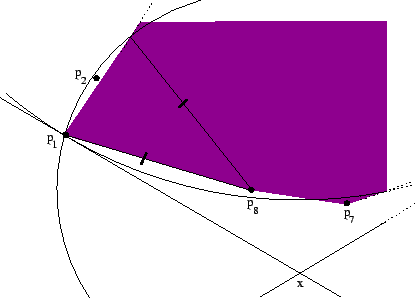
Point x is the intersection point of two lines.
The first line passes through p1 and is perpendicular to segment p1p3.
The second line passes through p5 and is perpendicular to segment p5p3.
Point x is directly below segment p1p5; in fact,
segment xp3 is the perpendicular
bisector of segment p1p5.
Figure 8:
Segments xp1 and p1p3 orthogonal; segments xp5 and p1p5 orthogonal (2 of 6).
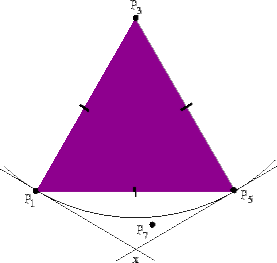
Point p7 lies inside the triangle xp1p5 but outside
the circle centered at p3 with radius d.
There is space for p7 in the triangle because
line segments xp1 and xp5 are tangents of the circle centered at p3.
Figure 9:
Point p7 lies inside triangle xp1p5 but
d (p3, p7) > d (3 of 6).
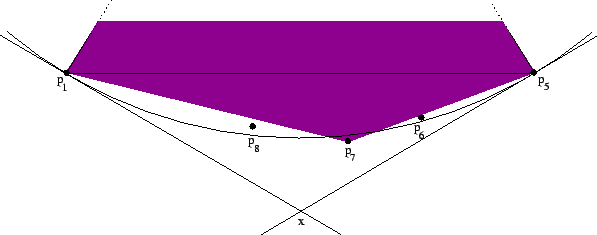
Point p8 lies below the line determined by p1 and p7
and inside the circle centered at p3 with radius d.
Similarly, p6 lies below the line determined by p5 and p7
and inside the circle centered at p3 with radius d.
There is space for p8 because
p7 lies inside triangle xp1p5 and segment xp1 is a tangent
of the circle centered at p3.
Symmetric arguments apply to p6.
Figure 10:
Point p8 lies below p1p7 but
d (p3, p8) < d; similarly for p6 (4 of 6).
Point p2 lies to the left of the line through p1 and p3
and inside the circle centered at p8 with radius
d (p1, p8).
Similarly, p4 lies to the right of the line through p1 and p5
and inside the circle centered at p6 with radius
d (p5, p6).
There is space for p2 because p8 lies inside triangle xp1p5
so the angle p8p1p3 is less than 90 degrees.
As a result, the circle centered at p8 intersects
the line determined by p1 and p3 at p1 and somewhere above p1.
Symmetric agruments apply to p4.
Figure 11:
Point p2 lies to left of p1p3 but
d (p2, p8) < d (p1, p8) (5 of 6).
Corollary 3.1a
The Dobkin and Snyder algorithm will fail
regardless of the point we start with
or the direction in which we traverse the polygon.
(Click for the proof.)
See if you can construct the polygon described above
and then watch how the Dobkin and Snyder algorithm handles it.